Thursday, December 4, 2014

Banana Walnut Cake~

Banana Walnut Cake

Gonna make lotsa noms for my sister's zadankais in the weekend. First up is banana cake! Tried one of David Lebovitz's recipe from my newly bought cookbook, Ready for Dessert. Original recipe is here. I lowered the fat and sugar content as there will be old folks at the zadankai. Last thing I want is one of them to get a heart attack after eating my cake =S

Cake is moist and soft. I guess it must be the magic of sour cream. Cinnamon and banana go really well together as well. The kitchen smelt lovely with the blend of banana and cinnamon while the cake was baking. Had trouble chasing my dog away as she smelt it from the bedroom and think it's her food. I skipped the coffee powder simply because I don't have coffee powder at home hahahahh!! But I think it'll taste great if you followed the recipe to add a tablespoon of it.

Banana Walnut Cake (modified from David Lebovitz's Banana Cake with Mocha Frosting and Candied Peanuts)

Ingredients:
350 g all purpose flour
1.5 tsp ground cinnamon
1/2 tsp baking powder
3/4 tsp baking soda
1/2 tsp salt
200g unsalted butter
200g sugar
1 tsp vanilla extract
2 eggs
6 tbsp lite sour cream
450g bananas, mashed
120g walnuts, coarsely chopped & toasted

Method:
1. Preheat oven to 175°C & prepare a 9"x9" square baking tin
2. Combine flour, cinnamon, baking powder, baking soda & salt in a bowl
3. Cream butter & sugar in a separate bowl with a mixer on medium speed until light & fluffy
4. Add in vanilla, then eggs one at a time into butter & sugar mixture
5. Stir in half of flour mixture into creamed mixture
6. Add in bananas and sour cream and stir
7. Pour in the remaining flour mixture and mix till just combined
8. Bake for 50mins or until the centre is set

Banana Espresso Chocolate Chip Muffins

Banana Espresso Chocolate Chip Muffins


Baked is a bakery in New York, famous for its fudgy brownies. I once saw their salted caramel brownie on Food Network Channel, damn I wish I was in USA right now! And...well you know baking young men are pretty hot you know! *coughMattLewiscough* I must say these guys at Baked love salt too. I think it's a guys thing to like savory foods. The recipe calls for slightly more salt than other muffin recipes do, so you can taste a slight note of salt here and there. But salt in dessert is in 'fashion' now, think salted caramel, sea salt in ice cream, and sprinkling fleur de sel over cupcakes. Can't wait to try out more interesting recipes from this book.


Banana Espresso Chocolate Chip Muffins (adapted from Matt Lewis & Renato Poliafito's Baked: New Frontiers in Baking)
Makes 12 muffins

Ingredients:
1 1/2 cups mashed, very ripe bananas (about 4) (I mashed them just before I'm abt to use them because bananas brown quickly)
100g sugar
54g light brown sugar
113g unsalted butter, melted
60ml whole milk
1 large egg
210g all-purpose flour
1 tsp instant espresso powder
1 1/2 teaspoons baking soda
1 tsp salt
170g semisweet chocolate chips

Method:
1. Preheat oven to 175°C
2. Spray a 12-cup muffin pan with nonstick cooking spray
3. In a medium bowl, stir together the bananas, sugars, butter, milk, and egg
4. In another medium bowl, whisk together the flour, instant espresso powder, baking soda and salt
5. Make a well in the middle of the dry ingredients
6. Pour the wet ingredients into the well and stir just until combined. Fold in the chocolate chips.
7. Fill each cup about 3/4 full. Bake in the center of the oven for 20-25 mins, until a toothpick inserted in the center of the muffin comes out clean (Mine took 27mins)
8. Move the muffin pan to a cooling rack, and let cool for 15 minutes. After 15 minutes, remove the muffins from the pan and let them finish cooling on the cooling rack. Muffins can be stored in an airtight container for up to 2 days.

Chocolate Banana Studded Cake

Chocolate Banana Studded Cake


The recipe is written as per Rose Levy Beranbaum's book, but I made the ganache the night before so that it has enough time to set for frosting consistency. It was still kind of thin for my liking, but nevertheless taste great, how can ganache go wrong anyway. I have quite a good amount of leftover ganache, so you might want to reduce the ganache recipe if you are only planning to smear a thin layer on the cake like mine.

Was kinda messy with the ganache and the studding. Hand picking the mini chocolate chips one by one and meticulously (well, not that much as you can see from the pictures) placing them on the frosted cake took me about half an hour or so. Think I ought to place strips of parchment paper underneath the cake the next time I do frosting as the dripping wet ganache makes my cake look like it's wearing an evening gown.

The cake tastes awesome. The fruity banana flavor really makes this cake special from the typical chocolate cake. I also like how the cake is so velvety and fine crumb-ed. Somehow, everything I've made from this book turns out amazing. And the chocolate chips on top provides an extra bite to the cake.

Chocolate Banana Studded Cake (adapted from Rose Levy Beranbaum's Rose's Heavenly Cakes)

Ingredients:

Batter:
42g unsweetened (alkalized) cocoa powder
88g boiling water
112g ripe banana, peeled and lightly mashed
90g sour cream
2 large eggs, room temperature
3/4 tsp pure vanilla extract
156g cake flour
200g superfine sugar
1 tsp baking soda
3/4 tsp baking powder
1/4 tsp salt
142g unsalted butter, room temperature

Method:
1. Preheat oven to 175°C. Prepare a 9" round cake pan, encircled with a cake strip, bottom coated with shortening, topped with a parchment round, then coated with baking spray with flour
2. In a medium bowl, whisk the cocoa and boiling water until smooth. Cover with plastic wrap to prevent evaporation and cool to room temperature, about 30 mins. To speed cooling, place it in a refrigerator. Bring it to room temperature before proceeding.
3. In a food processor, process the banana and sour cream until smooth. Pulse in the cocoa mixture, eggs, and vanilla and process briefly just to blend.
4. In a bowl of a stand mixer fitted with the flat beater, mix the flour, sugar, baking soda, baking powder, and salt on low speed for 30 secs.
5. Add butter and half the banana-cocoa mixture. Mix on low speed until the dry ingredients are moistened. Raise the speed to medium and beat for 1 1/2 mins. Scrape down sides of the bowl.
6. Starting on medium low speed, add the remaining banana-cocoa mixture in 2 pats, beating on medium speed for 30 secs after each addition to incorporate the ingredients and strengthen the structure. The batter will be light but creamy.
7. Using a silicone spatula, scrape the batter into the prepared pan and smooth the surface evenly with a small offset spatula.
8. Bake for 35 to 45 mins, or until a wire cake tester inserted in the center comes out clean and the cake springs back when pressed lightly in the centre. The cake should start to shrink from the sides of the pan only after removal from the oven.
9. Let the cake cool in the pan on a wire rack for 10mins. Run a small metal spatula between the sides of the pan and the cake, pressing firmly against the pan, and invert the cake onto a wire rack that has been coated lightly with a nonstick cooking spray. To prevent splitting, reinvert the cake so that the top side is up. Cool completely.

Ganache Studded with Chocolate Chips:
227g dark chocolate, 60% to 62% cocoa, chopped (I use 55% Valrhona)
232g heavy cream
2 tsp pure vanilla extract
2 tbsp liqueur of your choice or extra cream (I use Baileys)
325g chocolate chips (I used only about 100g)

Method:
1. In a food processor, process the dark chocolate until very fine.
2. In a 2-cup or larger microwavable cup with a spout (or medium saucepan over medium heat, stirring often), scald the cream (heat it to the boiling point; small bubbles will form around the periphery).
3. With the motor of the food processor running, pour the cream through the feed tube in a steady stream. Process for a few seconds until smooth. Pulse in the vanilla and liqueur or cream, if using.
4. Scrape the ganache into a glass bowl and let it sit for 1h. Cover with plastic wrap and allow it to cool at room temperature for several hours, until the mixture reaches frosting consistency. The ganache keeps for 3 days at room temperature, for 3 weeks refrigerated, and 6 months frozen.
5. When the cake is completely cool, spread a little ganache onto the 9-inch cardboard round or serving plate and set it on top. If using the plate, slide a few wide strips of wax paper or parchment under the cake to keep the rim of the plate clean. Frost the top and sides of the cake with ganache.
6. Stud the cake all over with chocolate chips, pointed ends in. It will take about 45mins to place chips close together. Fewer chips more widely spaced also are very attractive. Or, if desired, form a design with a combination of dark and milk chocolate or peanut butter chips. If using the paper strips, slowly slide them out from under the cake before serving.

Wednesday, December 3, 2014

Chocolate-Chocolate Chunk Muffins

The week has been mad hectic. Been working till 9+pm this week, was seeing double by the time my day ends. Took a breather today by making some muffins. I noticed how I've been falling back on muffins for my baking fix as they are really simple to make.

These muffins served themselves as my sister and my breakfast this morning. Contrary to most sugary-filled chocolate bakes, these chocolatey muffins are only slightly sweet yet filled with rich chocolatey goodness. The buttermilk contributed to the muffins' moist and tender texture. If you can get away with calling chocolate as breakfast, then these muffins are for you!

Chocolate-Chocolate Chunk Muffins (adapted from Dorie Greenspan's Baking: From My Home to Yours)
Makes 12 muffins

Ingredients:
84g unsalted butter
113g bittersweet chocolate, coarsely chopped (I use half 70% dark chocolate and half 55% semisweet chocolate)
280g all-purpose flour
133g cup granulated sugar
30g cup unsweetened cocoa powder, sifted
1 tbsp baking powder
1/2 tsp baking soda
1/2 tsp salt
300ml buttermilk
1 large egg
1 teaspoon pure vanilla extract

Method:
1. Center a rack in the oven and preheat the oven to 190°C. Butter or spray the 12 molds in a regular-size muffin pan or fit with paper muffin cups. Place the muffin pan on a baking sheet.
2. Melt the butter and half the chopped chocolate together in a bowl over a saucepan of simmering water. Remove from the heat.
3. In a large bowl, whisk together the flour, sugar, cocoa, baking powder, baking soda and salt.
4. In a large glass measuring cup or another bowl, whisk the buttermilk, egg and vanilla extract together until well combined.
5. Pour the liquid ingredients and the melted butter and chocolate over the dry ingredients and, with the whisk or a rubber spatula, gently but quickly stir to blend. Do not overmix the batter.
6. Stir in the remaining chopped chocolate. Divide the batter evenly among the muffin cups.
7. Bake for about 20 mins, or until a thin knife inserted into the center of the muffins comes out clean. Transfer the pan to a rack and cool for 5 mins before carefully removing each muffin from its mold.

Chocolate Chocolate-Chip Muffins ~~

I'm still not in the best of moods, but life has to go on whether I like it or not. Now I truly understand what human revolution means. Thank you special-you.

To baking! Used to shun anything-Nigella Lawson. She's the queen of comfort foods, and sometimes...too comforting. I mean, check out the size of her growing hips (But her face is still so pretty!). But after reading reviews and the ingredients of this recipe, I thought it might be worth a shot. And it probably is.

This recipe is incredibly easy, especially good for novice bakers to start on. The muffins are soft, fluffy and moist. Probably the work of vegetable oil. But with respect to the taste department, not as fanciful. I guess that's why some muffin recipes call for the best of both worlds - half butter, half vegetable oil. The muffins are pretty light in terms of taste as well. If you prefer dense rich flavors, you will think it's lacking in the chocolate, pretty different from the usual intense Nigella recipes. You might want to sub some flour for cocoa powder if you wish to have it more chocolatey. But they're really popular with my mom and her friends as the generous sprinkling of chocolate chips got them craving for more.
Chocolate Chocolate-Chip Muffins (adapted from Nigella Lawson's Feasts: Food that Celebrates Life)
(makes 12 muffins)

Ingredients:
245g all purpose flour
2 tsp baking powder
1/2 tsp baking soda
2 tbsp cocoa powder
150g caster sugar
135g semisweet chocolate chips plus 45g for sprinkling
240ml milk
80ml + 2 tsp vegetable oil (I use olive)
1 egg, room temperature
1 tsp pure vanilla extract
I added 1/2 tsp instant coffee granules to the dry mixture to heighten the chocolate

Method:
1. Preheat oven to 200°C and line muffin pan with paper liners
2. Put together flour, baking powder, baking soda, cocoa, sugar and 135g chocolate chips in one bowl
3. Combine liquid ingredients in measuring jug
4. Mix dry and wet ingredients together and stir till just combined
5. Add in flour mixture and mix until just combined
6. Spoon muffin batter into muffin cups
7. Sprinkle 45g chocolate chips on top
8. Bake for 20 mins and transfer to wire rack to cool

Old-School Muffins (Chocolate Chip)

What happens when you only have a spare hour left and you need a baking fix?

Muffins! Yay!!

Like all muffins they taste the best fresh from the oven. Crispy golden brown tops with moist insides. Leave them inside a container for a day, they will taste like your grandma's old socks.
Old-School Muffins (adapted from Alton Brown's I'm Just Here for More Food) 
(makes 12 standard muffins, 16 for me) 

303g cups all-purpose flour 
2 tsp baking powder 
1 tsp baking soda 
a pinch salt 
100g sugar 
120ml vegetable oil 
1 egg 
1 egg yolk 
240ml plain yogurt 
1-2 cups ‘bits and pieces’ (nuts, berries, chocolate chips, or any combination thereof – but no more than 1 cup of chocolate chips) - I use 175g mini chocolate chips 

Method: 
1. Place an oven rack in position C and preheat oven to 190°C.
2. Prepare a muffin tin and set aside.
3. Sift together all your dry goods.
4. Combine all your liquid ingredients.
5. Add the wet ingredients to the dry and stir until just combined. Do not overmix.
6. Using the disher, drop the batter into the prepared tin. The cups should be full.
7. Bake for 18 to 20 minutes, or until the muffin interior hits 100°C or a toothpick inserted into the bottom of a muffin comes out clean.
8. Remove from the oven and immediately turn the muffins on their sides so that steam can escape the pan. Skip this step and you'll have mushy bottoms, which is okay if you like that kind of thing.
9. Serve immediately or store in an airtight container for up to a week or until they taste gross, smell bad, or grow fur. 

Cinnamon & Raisin Wholemeal Bread Pudding ,肉桂,提子全麦面包布丁~

 营养丰富的Bread Pudding ~


家里因为有剩8片的全麦面包,就决定做这简单,好吃的面包布丁 ~ 即营养又能填饱肚子 =)当早餐最合适不过,不然冰起来几个小时后冰冰凉凉的,再配上Vanilla Ice-cream 简直是享受啊 ~

我试过3种不同食谱的Bread Pudding ,前两个用了RUM酒添加风味。我特别喜欢香料,尤其是这Cinnamon 桂皮的味道 =)所以这次决定免掉Rum 酒 ,再加上家人不喜欢的桂皮粉。。哈哈哈哈 ~ 打算和儿子两人吃就好。。嘻嘻嘻嘻。。。。。


肉桂,提子全麦面包布丁
Cinnamon & Raisin Wholemeal Bread Pudding :

材料:

A)
0.5 Cup Raisin 葡萄干
0.5 cup fresh Orange Juice 鲜橙汁 

B )
8 Slices Plain Toast 白土司 / 全麦土司
3 Tbsp Melted SCS Salted Butter 溶化有盐牛油
1 Tsp Cinnamon Powder 肉桂粉 ( Optional ,可以不放 )

C )
500ml Fresh Warm Milk / Whipping Cream 温鲜奶 / 鲜奶油 /
4 Tbsp Brown Sugar 黄糖
4 Big eggs 大颗鸡蛋

D )

Sugar 糖少许撒面用。 

-------------------------------------------------------------------------------

做法

1.用橙汁浸泡葡萄干,放入冰箱浸泡1小时。备用。

2. Preheat Oven 180‘C .把面包切小块,排在烤盘上。然后在面包表面均匀涂抹融化牛油,撒上肉桂粉。放入烤箱180度烤大概10-13分钟左右或金黄色,待凉备用。

3. 在温牛奶里加入鸡蛋,糖搅拌均匀至糖溶后过筛2次 ( 这就是布丁液 )>.< 忘了拍照 @@~

4.把烤好的面包丁放进大碗里,均匀的把橙汁和葡萄干倒入搅拌均匀,然后倒入布丁液搅拌均匀,放入冰箱中10分钟让面包充分的吸收布丁液。

5. 预热烤箱170度,准备8个耐高温Ramekins ,用油涂抹周围。

6.把面包布丁从冰箱里取出,再充分的搅拌一下 。把面包分量均匀的分到8个Ramekins里 ,然后在表层撒上一层糖。以170度 “ 水浴法 ” 烤30 - 35分钟,烤至布丁液凝固就可以了。

小贴士 :

** 用全麦面包口感较粗些,而用白土司再把厚厚的边缘切掉的话,能烤出口感滑滑的面包布丁。
** 可以在橙汁的部分加1.5 Tbsp的Rum酒 , 味道更好噢,葡萄干也可以换成你喜欢的Dried Fruit like Cranberries , prune , apricot or Mix fruits .
** 要味道好的话建议用一半鲜奶 加一半的鲜奶油 ,但我要比较健康的就用了100% 鲜奶 。
** 在表面上撒糖烤出来的布丁表层会比较脆 =)但是如果收进冰箱过的话,因为湿气的关系就会破坏掉那原本焦硬的糖,变得不脆。 
橙汁浸泡葡萄干一小时

 面包切丁,涂抹牛油和撒上Cinnaman . 180度烤10-13分钟 。

 黄糖

把吸收好蛋液的面包分到8个Ramekins里,在烤盘里倒入一半的水即可以烘烤了。 

烤之前来个特写 =)

170’C , 水浴法烤 30-35分钟或蛋液凝固即可 =)

Clear Mayonnaise ,Pork Floss Bun 自制美乃滋肉松面包~

Clear Mayonnaise ,Pork Floss Bun 自制美乃滋肉松面包~


今天的主角是 " Clear Mayonnaise " 因为想清掉朋友送来的两大包泰国肉丝。。于是便想到了做马铃薯面包+肉松,想做类似BreadTalk & Sweet Heng 他们用的那种Mayonnaise ,颜色稍微透明。。不同于一般在外面看见白色/乳黄色的Mayonnaise ,这透明的Mayo吃起来没那么腻,味道不会很浓,很好吃 =)

于是,昨天早上网上终于给我找到了=)虽然分享者说100%像BreadTalk的Mayo .. 但,我并不那么认为。我只能说虽然我喜欢这Clear Mayonnaise , 但他还是和BreadTalk的Mayo有一段小距离。
昨天下午,仔细看了食谱。。眉头皱皱的感觉糖太多了~ 不喜欢太甜的我就狠狠的Cut cut cut 掉了很多很多的糖量。随便拿了家里的Planta来试煮,煮出来感觉是成功了! 但是就是觉得Planta的味道太浓了。。不甘心,再尝试第二次~ 这一回用了家里仅有的President Butter 。。mmm...味道明显比Planta的好多,还是比不上Breadtalk的Clear Mayo 。我想其中做法大同小异,主要是大家用的牛油味道不同,而煮出了不同风味的Clear Mayo =)
我在想下一次是不是可以再加些什么能帮助提升这Clear Mayo的味道呢 ?大家如果有什么好意见或好的Clear Mayonnaise recipe 请记得与我分享哦。。


Clear Mayonnaise 

A)
25g Sugar 白糖
1.5g Salt 盐
18g Butter 牛油
150g Water 水

B )
15g Sugar 白糖
17g Corn Starch 玉米粉 /粟粉
70g Water 水

做法

1)拿个小锅子把A材料全部放进去,小火煮至糖和牛油溶化(不要关火继续煮)。
2)把B的材料均匀搅拌,当A材料开始滚的时候,就慢慢的把B材料以搅拌式拌入A里。期间不停的搅拌直到Mixture开始变浓和透明即可离火 。待凉备用。

*** Clear Mayonnaise 待凉后,冷藏可以收上一个月。

---------------------------------------------------

马铃薯面包体
材料 :

120ml milk 鲜奶
1/2 egg 半粒鸡蛋
80g mashed potato 马铃薯泥
salt 盐适量
30g sugar 细糖
25g butter 牛油
300g bread flour 高筋面粉
2 tsp yeast 酵母

装饰馅料:
Clear Mayonnaise - 适量
肉丝 - 适量
----------------------------------------------------
做法:

1) ** 面包机 - 全部材料放入面包机,注意顺序为 :鲜奶 ,蛋,马铃薯泥、Butter 、糖、盐,面粉,酵母,然后选择发面程序让面包机工作,并在面包机里进行第一次发酵.

** 手揉方式 - 先把全部的干材料先放进大盆里均匀的把干材料搅拌好,随后加入蛋液,马铃薯泥 ,鲜奶 。慢慢的揉成团,然后把牛油包入面团中间,再继续揉面至有延展性,然后进行第一次发酵 。

2)第一次发酵后,排气分割成每个60g的重量。然后把分割好地面团做两次的擀卷和最后整出Oval 椭圆形就可以放在烤盘里进行最后发酵45分钟-1小时或双倍大就可烘烤。

3 )预热烤箱180度烤 。然后再最后发酵好的面包表面涂抹蛋液就可以放入烤箱烘烤 20分钟或到表面金黄。。

4 )待面包凉了,使用刀子往中间切开但不要切断。在面包中间和表面涂抹Clear Mayo,然后轻轻的把肉松沾黏在面包表面即可。


小贴士:
*** 擀卷Video和孟老师的教导可以在爱上5℃液种迷你土司~步骤里看到。
***因为马铃薯主面团本身就很软,我没有等中间发酵就直接擀卷和做造型也没问题。

 
 Soft Potato Bun + Clear Mayonnaise + Pork Floss = Yummy yummy bun =)

今天的主角 Clear Mayonnaise

第一次发酵过后的马铃薯主面团满黏手的,这是我惯用的简单小妙招 - 撒粉!解决黏手的问题。然后进行分割~

 7个Potato Plain Bun 准备给Huhu Bak hu 面包的 , 也特地做了4个Cinnamon roll 慰劳自己 =)

 最后发酵好了的马铃薯面包体,肥肥的。。好可爱=)

 凌晨1:20分终于烤好了~

 隔天拍的马铃薯面包组织照片。

中间切开一刀,在里面和外层都涂抹自己做的Clear Mayonnaise 。

撒上肉丝,完成了 =)


5'C YeZhong Rich Chocolate Toast , 液种 - 浓郁巧克力山形土司 ~

5'C YeZhong Rich Chocolate Toast , 液种 - 浓郁巧克力山形土司 ~

Chocolate bread Loaf  =)

不太顺利的巧克力面包 >< ~ 原本想做Chocolate Chip Bread Toast的,怎么知道太早把Chocolate Chip放进面包机里搅拌,搅一搅结果都融化了。。哈哈哈。。。结果就这样变成了Chocolate面包。。没有 “ Chip ” 呵呵呵呵。。。下次记得要在擀卷时才加入Chocolate Chip才是对的时间,虽然在步骤上失误没造成什么大问题,反倒出现了另一个令我非常气愤的事情,就是美美烤出来的柔软的巧克力面包被那混蛋的RedMan Non-stick Loaf pan 给沾黏住了!
都说是Non-Stick 不沾黏了,尽然还。。。气死我了拉,根本不能把刚烤好的面包拿出来待凉啦,热乎乎的面包还得用上我的轻功,小心翼翼的把面包左右摇摆,带拉半扯的把面包去出来。。虽然表面上看是Ok。。但是底部就很受伤。难过~

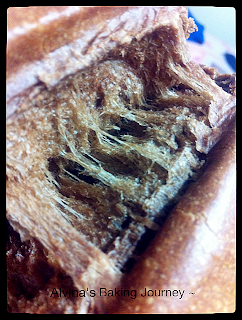
除了不开心的沾黏问题,这5度液种的柔软+浓郁的巧克力味可真的很不错 =)小孩爱死了  !反倒是我不敢吃太多。。。因为高卡拉,要跑多少圈才能消耗掉啊 >< !!!


冷藏液种制作-

300g 高筋面粉
300g 水
 1g 酵母 = 1/3 Tsp

将所有配方搅拌至酵母完全溶入面团中即可
室温发酵1小时, 然后封闭罐中放入冰箱冷藏至少16小时 ( 20-24小时更好 =)), 备用。


液种巧克力面包 ~

这个分量可以做出一条450g的山形土司

39g Water 水
16.5g Honey 蜜糖
39g Egg 鸡蛋
39g Butter 牛油
260g YeZhong  冷藏液种
4g Salt 盐
75g Sugar 糖
235g Bread flour 高筋面粉
20g Cocoa Powder 可可粉
80g Melted Chocolate 融化巧克力
4g Yeast 干酵母

做法 :1) ** 面包机 - 全部材料放入面包机,注意顺序为 :鲜奶 / 水,蛋,蜂蜜,液种、融化巧克力,Butter 、糖、盐,可可粉,面粉,酵母,然后选择发面程序让面包机工作.
** 手揉方式 - 先把全部的干材料先放进大盆里均匀的把干材料搅拌好,随后加入全蛋液,蜂蜜,液种,融化巧克力,鲜奶 / 水 。慢慢的揉成团,然后把牛油包入面团中间,再继续揉面至有延展性,然后进行第一次发酵 。

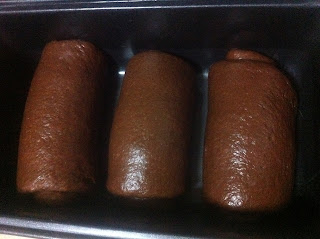
2) 第一次发酵好45-60mins 至双倍大 。取出面团称出总重量,分割成3等份。分割后滚圆面团,放置在烘盘上进行第二次发酵或称为中间发酵注意摆放面团时距离开一些,然后盖上保鲜膜室温放置10分钟。第二次发酵完成后,进行2次的擀卷步骤 ,就是把面团擀开成椭圆形,轻轻由下到上轻轻卷起 ,再休面团5分钟。再擀开成椭圆形,再轻轻卷起,之后慢慢的把三份面团并排放入土司不粘模里做最后发酵45-60mins 或 8分满模,扫上蛋液或鲜奶即可以180度烘烤25-30分钟 。

3)土司一但烤好,就要立刻脱模。等到完全凉了就可以切了=)
*** 擀卷视频和孟老师的手揉面团教学视频可以在爱上5‘C液种迷你土司 里找到。


 面包机揉面团+发酵

 没有回缩 ,完美发酵 !

到出来准备进行分割 。

 进行了第一次的擀卷,休面10分钟。

完成了2次的擀卷。

等待最后发酵 =)

 最后发酵8-9分满,Ok了可以烤了 =)

看这气死人的“ 不沾模 ” 破坏了我的心情 !

幸好好有一条能见人拉。。结果把那美美的巧克力土司送给侄儿,侄女们吃了 =)

掰开来看 ! 牵丝的哟 ~ ~

Melonpan菠萝包( 天然酵母- Yogurt种+中种 )


中种面团材料:

高粉100g
快速酵母 1g ( 1/3 Tsp )
鲜奶75g。

做法:

1)高粉过筛+酵母,鲜奶慢慢加,用面包机打成团。(稍微粘手)
2)滚圆,放入钢盆,面团表面喷些水。(避免干燥)
3)发酵120分钟。(原来的2.5倍大,面团不回弹就可以了)

---------------------------------------

Cookie Dough 菠萝包外皮 :

Melonpan 制作Video

25g 无盐牛油(室温)
35g 糖
25g 全蛋液 ( 打散)
80g 低筋面粉 (过筛)
1/4 tsp 发粉
做法:
- 先把牛油放进碗里,稍微搅拌一下。接着分两三次把糖加进去搅拌均匀,再加入鸡蛋液拌均匀。最后把底筋面粉+发粉分两次加下去搅匀就可以包起来收进冰箱1小时待用。。

 --------------------------------

 面包主面团材料:

发酵好的中种全部
高粉46g
幼糖12g
盐2g
优格酵种46g  (Yogurt 种天然酵母制作 )
鲜奶31g
牛油12g

 做法:

 1)中种拔小块放入面包机,筛入主面团的高粉+奶粉+幼糖+盐+优格酵种,鲜奶慢慢加,打至卷起,加入牛油打至可拉出薄膜.
2)將面团滾圆,收口捏紧朝下放入抹少許油的保鮮盒中。
3)在面团表面噴一些水避免乾燥,然后用保鲜纸包好,在烤箱里放一杯热水然后把面团放进去发酵2小时或至双倍大。
4) 手粘面粉,将发好的面团取出后,排出空气。
5)分割5-6等份50g -60g ),將全部面团搓成圆形放在烤盘上。
6)然后从冰箱里拿出之前做好的Melonpan 外皮,把分量分为5-6等分。。搓圆压扁然后用按压的方式把菠萝包皮覆盖在整个面包面团上,然后用手抓着面包底部把整个表面粘在白糖里,取出来再轻轻割上几刀就可以放回烤盘上进行最后发酵1小时或至双倍大 。
7)预热烤箱200度烤15-17分钟即可。(温度,时间只供参考)

准备最后发酵的MelonPan 面包 ~

好了 ~

很柔软哦 ~ 好后悔做得太少了。。。


天然酵母鲜奶土司(Yogurt种+中种)

天然酵母土司 =)

好吃柔软的天然酵母土司,老实说他并不属于100%纯天然酵母面包,因为里面还是添加了1-2g 的干酵母。。。为什么呢?因为若使用100%天然酵母的话很可能会使面包口感较为紧实黏密,没有蓬松干,口感较硬等。。。我还在学习阶段所以选择适当的添加小小量的干酵母可以帮助到我的面包面团缩短发酵时间,而且可以减低喂Mr.Bin的风险拉 =)>< ~ ~

这是隔天拍的。。真的很柔软~ 而且奶香味比用Whipping Cream做的土司还要香~

 
鲜奶吐司~ 

中种面团材料

高粉216g
快速酵母2g ( 我只用了1g = 1/3 Tsp ) 
鲜奶154g

做法:

1)高粉过筛+酵母,鲜奶慢慢加,用面包机打成团。(稍微粘手)
2)滚圆,放入钢盆,面团表面喷些水。(避免干燥)
3)发酵120分钟。(原来的2.5倍大,面团不回弹就可以了)

--------------------------

主面团材料:

发酵好的中种全部
高粉92g
奶粉6g
幼糖25g
盐4g
优格酵种92g (Yogurt种制作 )
鲜奶62g
牛油25g

做法:

1)中种拔小块放入面包机,筛入主面团的高粉,奶粉,幼糖,盐,优格酵种.鲜奶慢慢加,打至卷起,加入牛油打至可拉出薄膜。(用面包机Dough Function 打30分钟)
2)將面团滾圆,收口捏紧朝下放入抹少許油的保鮮盒中。
3)在面团表面噴一些水避免乾燥。
4)蓋上保鮮盒蓋,在Oven里放一杯热水,再把保鲜盒放進Oven里发酵2小时看见面团发酵至2.5倍大即可。
5)手和桌面撒一些高粉,将发好的面团取出后,排出空气。
6)分割成3等份(每份220g)搓成圓形,蓋上保鲜膜再讓麵團休息30分鐘。
7)將面团橄成長形後翻面由短向捲起,蓋上保鲜膜再讓面团休息15分鐘。
8)休息好的面团用桿面棍桿成長條(由短向捲起,收口朝下間,隔適當排入吐司烤模中(若不是不沾烤盒,請刷上一層奶油避免沾粘)。
9)噴些水蓋上保鲜膜再發酵100分鐘。
10)放入預熱到200度烤箱烤25-30分鐘。
11)出爐後馬上倒出放在鐵網架上放涼,待凉后才切片。

因为干酵母我只用了1g 还真怕发得不好呢。。幸好还顺利!

我把分量做多了一些,这些小面包凉了之后我就马上把它们冰冻起来。。
可以保存一个月哦~ ~